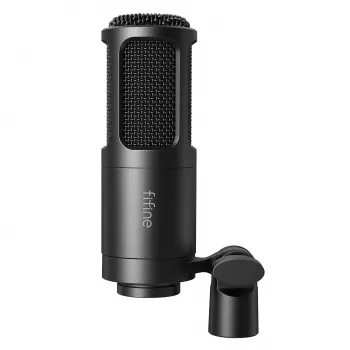
XLR Dynamic Cardioid Mic for Streaming & Studio Voice
Professional XLR Dynamic Microphone with Cardioid Pickup for Studio & Streaming
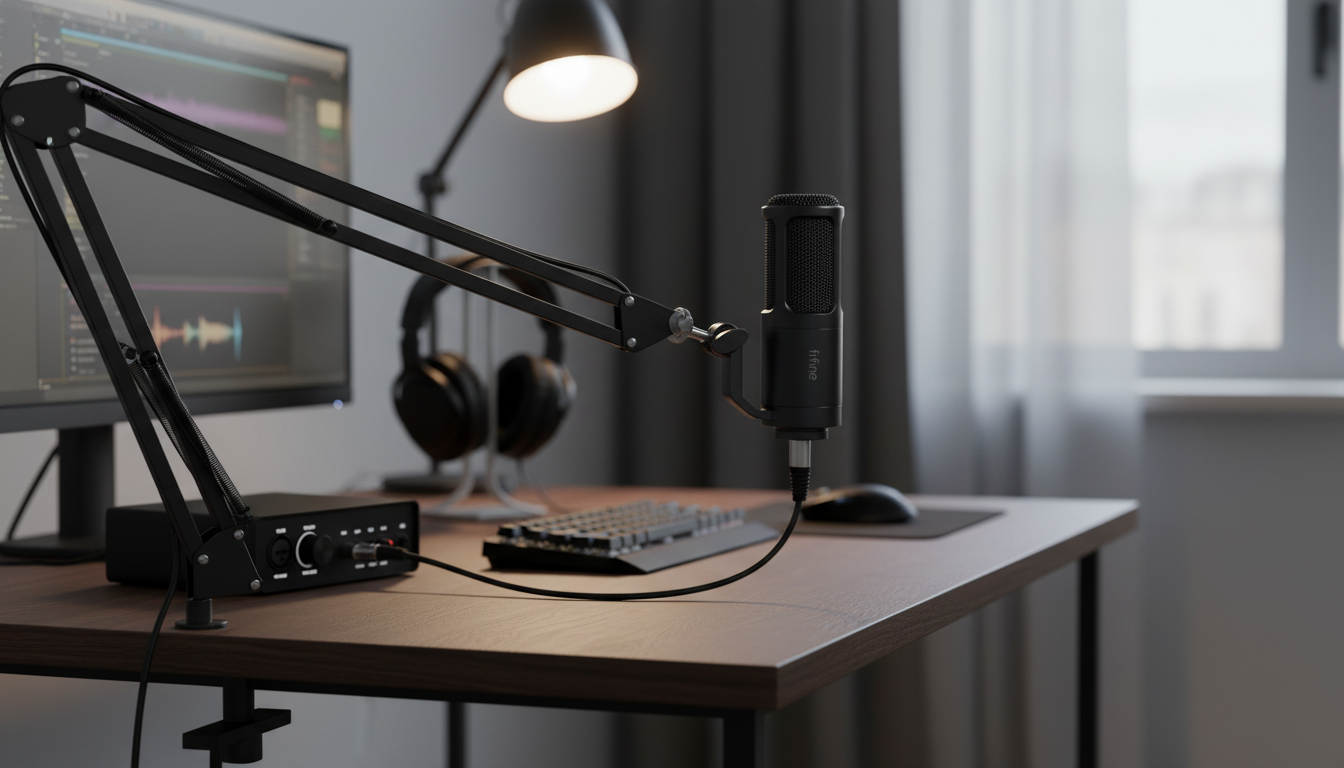
A cardioid dynamic XLR microphone is a dependable choice for spoken voice when the room isn’t perfectly treated. With a focused pickup pattern, strong rejection of off-axis noise, and XLR connectivity for audio interfaces and mixers, it supports clean, broadcast-style sound for streaming, podcasts, voiceovers, and home recording.
What this microphone is designed to do
This style of microphone is built for confident, close-up speech capture—where clarity matters and distractions (room echo, keyboard noise, PC fans) need to stay in the background.
- Capture clear, present vocals while reducing room echo and background sounds with a cardioid pickup pattern
- Handle close-mic speech well, making it suitable for streaming, podcasting, voice chat, and narration
- Connect through XLR to an interface, mixer, or preamp for stable signal and flexible gain control
- Fit into typical studio workflows with standard mic stands/arms and XLR cables
If you’re ready to add an XLR mic to your setup, you can find the Professional XLR Dynamic Microphone with Cardioid Pickup for Studio & Streaming in stock.
Cardioid pickup pattern: cleaner voice in everyday rooms
Cardioid microphones are designed to “listen” primarily to what’s in front of them, while reducing what comes from the sides and rear. For typical home desks and gaming setups, that directionality often makes a bigger real-world difference than chasing expensive acoustic panels.
- Front-focused pickup emphasizes the speaker and reduces keyboard clicks, PC fan noise, and reflections arriving from the sides and rear
- Best results come from speaking into the front of the mic (not the side), keeping the mouth on-axis
- Maintain consistent distance for a steady tone; closer placement increases fullness and reduces room sound
- Use basic room control when possible: soft furnishings, curtains, and turning noisy devices away from the mic’s rear
For a practical overview of placement habits that improve clarity, Shure’s guide to microphone techniques is a helpful reference.
Dynamic microphone advantages for streaming and spoken word
Dynamic microphones are commonly chosen for broadcast-style voice because they handle close distances well and tend to ignore more of the room compared with many condenser mics.
- Dynamic capsules typically tolerate louder sources and close positioning without harshness
- Less sensitivity than many condensers can mean fewer room reflections and less ambient pickup
- Works well for voice where consistency and intelligibility matter more than ultra-bright detail
- Pairs naturally with broadcast-style processing: gentle compression, de-essing, and a high-pass filter
Getting connected: interface, mixer, and gain basics
An XLR microphone needs a device with a microphone preamp—usually an audio interface or a mixer—before it can feed a computer. The goal is a strong, clean level without clipping, while keeping noise low.
- XLR requires an audio interface or mixer with a microphone preamp; connect with a balanced XLR cable
- Set input gain so normal speech peaks safely without clipping; leave headroom for louder moments
- Phantom power is often not required for dynamic mics; confirm your equipment and keep settings appropriate
- If gain must be turned near maximum and noise becomes noticeable, consider an inline preamp/booster compatible with dynamic microphones
Quick setup checklist
| Step | What to do | Why it matters |
|---|---|---|
| Mount & aim | Position the mic 2–6 inches from the mouth, aimed directly at the speaker | Improves clarity and reduces room sound |
| Connect XLR | Run an XLR cable to an interface/mixer mic input | Stable, low-noise connection |
| Set gain | Adjust so regular speech stays below clipping | Prevents distortion and keeps levels consistent |
| Add monitoring | Use headphones for direct monitoring if available | Catches noise, plosives, and level issues early |
| Control plosives | Add a pop filter or windscreen and speak slightly off-center | Reduces “p” and “b” blasts |
Sound shaping for a broadcast-style voice
You don’t need extreme processing to get a confident, “finished” voice. A few subtle moves usually beat heavy-handed filters.
- High-pass filter: Reduce low-end rumble from desk bumps, handling noise, and HVAC.
- EQ: Small cuts in muddy low-mids can improve intelligibility; avoid heavy boosts that add hiss.
- Compression: Gentle settings smooth volume swings without sounding squashed.
- Noise handling: Treat the source first (mic distance, keyboard placement) before relying on aggressive noise suppression.
If you’re curious about why “clipping” sounds harsh and why headroom matters, the W3C’s Web Audio documentation provides useful background on digital audio levels.
Placement tips that make the biggest difference
Mic technique is the fastest upgrade available—often more impactful than switching gear.
- Keep the mic closer than the keyboard; a small distance change often reduces keystrokes dramatically
- Aim the rear of the microphone toward your noisiest source (PC tower, fans, window) to maximize rejection
- Use a shock mount or stable arm/stand to reduce vibrations from desk taps
- Stay consistent: maintain the same posture and distance to avoid tonal shifts during streams
For streamers who show their room on camera, small set improvements can also help your on-screen presence—like adding a clean backdrop element such as the 31.5″ Large Round Decorative Mirror (in stock) to brighten a corner and reduce visual clutter.
Studio and streaming use cases
What to pair it with
Common issues and quick fixes
FAQ
Does an XLR dynamic microphone need phantom power?
Most dynamic microphones do not require phantom power. Confirm your microphone’s specifications, and leave phantom power off unless your connected gear or an inline device explicitly needs it.
How close should the microphone be for streaming?
A close distance—often a few inches—improves clarity and reduces room noise. Use a pop filter or windscreen and keep your position consistent to maintain steady tone and level.
What do you need to use an XLR microphone with a computer?
You’ll need an audio interface or mixer with a mic preamp, plus an XLR cable. Select the interface as your input in your recording/streaming software and set gain so speech stays strong without clipping.


Leave a comment